Showing posts with label Blogging. Show all posts

Sunday, March 30, 2014

This Whole Blogging Thing


As many of you know I just recently celebrated my first blogaversary…. He he, it is amazing how many words you can change to make it specific to blogging. But anyway… about blogging.

When I first started blogging it was because I wanted to write about mine and Cory’s trip through Europe. I am so glad I did that, because I am so thankful for the motivation to write down all of the wonderful times we had while we were there. I love being able to look back on the posts about various European adventures.

After I got home I didn’t really blog much for a while. My life wasn’t exciting anymore, I was just home, working, playing, working, playing. Just life. And then I realized… just life. Lightbulb! All of the little everyday experiences that seem so meaningless are so important for that very reason. It is my life. We only have one shot at this thing, and every day contributes to where we are going and what we are doing. And so I got back on the blogging wagon, fearful that I had already missed out on capturing many wonderful moments of everyday life.

In the last few months my ideas about blogging have evolved even further. I have “met” (read about, corresponded or commented back and forth with) many wonderful Christian women. Sometimes, being a believer in this crooked and depraved world, you have moments of feeling like you and your family and your tight circle are the only ones who have the same convictions. I have been so refreshed by the other blogs that I have come across who have rekindled my faith in the belief that there are still many good followers of Christ out there!

And so, having said all of that, I am taking that next tiny little step forward in blogging by beginning my sponsor page. I know what you are thinking, “you have like seven followers, how could you have a sponsor page???” Naturally… I can’t charge anything, of course. But I can swap buttons for free!
So, check out my sponsor page if you are interested. I am looking forward to branching out a little and meeting others who are like minded.

Thursday, March 27, 2014

One Year in and Loving It

Today marks a pretty epic day in my little life. One year since I joined the blogging world by publishing my first post.

It has been such a fun journey so far.... I didn't even realize how much I would love it. I used to always keep a journal, but these days that almost seems like a daunting task. It gets disheartening when you are going to journal, you open up the page in great anticipation.... only to discover you haven't written since two Christmas' ago. You feel compelled to write, "I have two new nephews... so and so is married... I did this.... Cory did that...." And so instead, you do the silly thing of putting it away till a later date when you have more free time to expound upon all of the many changes that have occurred. I don't think I need to explain what ends up happening with that situation most of the time.

But blogging is different... I just get to write about whatever I am feeling, without the self inflicted pressure of needing to record every momentous occasion in my life.

I love it.

And so, in honor of this blogging journey I have begun, I am going to re-post my very first post. When I read it, it takes me back to that exciting span in my life. It seems like so long ago, and yesterday at the same time.


Full of Life
March 27, 2013

Well here goes... I have always been anti-Facebook, which is totally unheard of in this day and age. Perhaps that is why I am... I loath conforming to social norms. However, I do love reading blogs... which I suppose is not much different. But in my own mind I have discovered and established a difference. A blog is written with purpose, not merely to let your buddies know what Starbucks you frequent (no offense to all you Facebookers, but you know what I mean).

I have never blogged before because I have not found that purpose that compelled me to do so. Until now...

I wanted the title of my blog to be "My Happy Little Life" because that is exactly how I feel about my life. It is the most completely wonderful life; however it is not as if I do a bunch of grand things. I just love living. I so often find myself quoting Meg Ryan in "You've Got Mail" in my head, "I lead a small life, well valuable but small." I feel exactly the same way.

Well, who would have known that many other people had already thought of "My Happy Little Life" as their own title. Every blog site with that title was already taken. I even visited a few of their sites because I felt that we must instantly be kindred spirits.

So I looked up the synonyms for "happy". What a truly wonderful word! The meaning that is wrapped up in those five letters. Cheerful, overjoyed, jubilant, thrilled, blessed... the list goes on and on. Blessed was my first choice, but of course that was already taken. Therefore I settled for "jolly". And you know, I think it suits me. Webster's definition of "jolly" in 1828 says, "Merry; lively; full of life and mirth; jovial. It expresses more life and noise than cheerful." And so I say, it is perfect! Full of live. That is exactly what I want to be.

Tuesday, March 11, 2014

How to Make a Blog Button For Dummies

Today I am going to talk about something a little bit out of the norm.

When I first started blogging, every other blog was talking about “grabbing buttons” and “swapping buttons.” I was like, “what the heck is this button thing?” Now I am by no means remarkably techy, so it took me a long time. But I did finally figure it out.

And so, in case anyone else is fairly new to blogging and feels a little daunted by the vast array of beautiful blog buttons and the importance that is placed on them in the blogosphere, I am going to write a brief “how to.”

how to make a blog button, blogging tips, how to create a blog button, blog button, help with blog button, easy blog button tutorial,

It may seem like I am not the best one to be explaining this because it is not my forte. But maybe I am perhaps the best one because it is not my forte. I will write it in such a way that anyone will be able follow the directions (with illustrations!). It will be kind of like “idiots guide to creating a blog button.” Very simple and easy to follow (especially cause I may need to reference it in a few weeks just in case I forget how to do it... he he).

Step one: Create your design

I did this in Picmonkey because it is free and super easy. Press edit. And open the photo that you want to use for your button (from your computer, web, or wherever the picture is located).

how to make a blog button, blogging tips, how to create a blog button, blog button, help with blog button, easy blog button tutorial,

First thing you want to do is crop your photo. It is most common for blog buttons to be square, so I would start with that. Press crop on the left and select square from the drop down menu. But don’t apply the crop just yet.

Now is when you want to chose the size of your button. Depending upon the width of your sidebar, you will choose the size. I personally think it is a good idea to make several sizes so that you have the option ready to go if people want to swap. Today we will make a fairly standard size of 250x250. Mark the “scale photo” box and then put in the dimensions you want in the “actual size” option. 250x250 here. After you choose the part of the image you want to used, hit the green “apply”. Make sure you are happy with your crop and the way your button looks.
how to make a blog button, blogging tips, how to create a blog button, blog button, help with blog button, easy blog button tutorial,
After you crop your image, you can play around with the effects, overlays, and frames to make your button exactly how you want.
how to make a blog button, blogging tips, how to create a blog button, blog button, help with blog button, easy blog button tutorial,

Now you want to add your blog’s name (or whatever you want to say) onto your button. Press the “T” symbol on the side to open the text tool then click "add text". I text box should pop up over your picture. Play around with the fonts, colors, and size you want until you find something you like. Place the text on your button. 
how to make a blog button, blogging tips, how to create a blog button, blog button, help with blog button, easy blog button tutorial,

If you like the way your button looks, then you are finished with the designing portion! Click on save. Make sure you save it somewhere on your computer where you will know right where to find it later.

how to make a blog button, blogging tips, how to create a blog button, blog button, help with blog button, easy blog button tutorial,
So you have your pretty button complete. If only that was it…. But now you have to code the button so that whenever anyone presses it, they are taken to your blog.

Step 2: Upload your button
This is where it gets a little complicated. But don't worry. If I can do it, you can too!

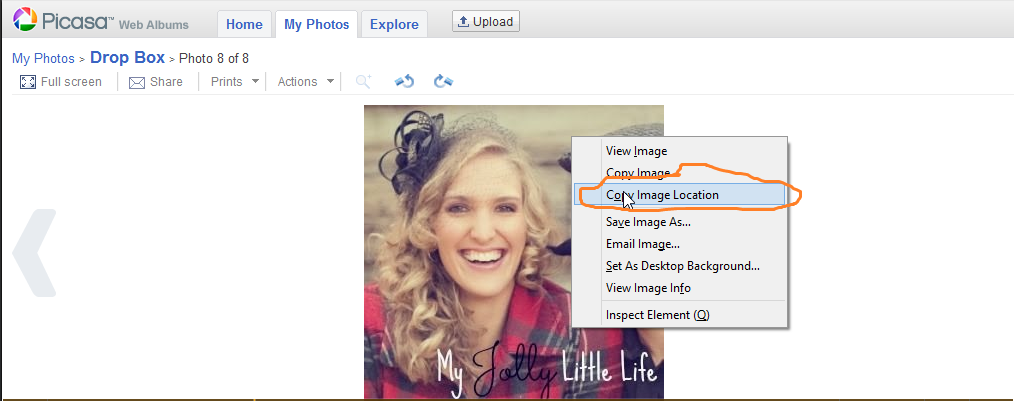
Upload your picture to Picasa web albums (I have done photobucket too, but I just found picasa to be easier). Either way, you will need to upload your image to a web hosting site.

After you upload your image to Picasa, right click and press "copy image location".
how to make a blog button, blogging tips, how to create a blog button, blog button, help with blog button, easy blog button tutorial,

Paste the image location into a word document that you can easily find. Don't be freaked out when it looks like this:


https://blogger.googleusercontent.com/img/b/R29vZ2xl/AVvXsEi86zRSP3NEZk8qQRqkBetGGSql67EoGVWpZ_k2PJtlP2TYqEbpghoiosqQ2ifosGMLMxUVA72pagUKj4HMmaB0zlRDC47oU40c9sJKKT7tclssYpXd3OT7BYQkAz90KccXDL7dxt4uONFu/s128/250x250.jpg

That is normal.  

Step 3: Create the code for your button with a grab box.

Okay... here we go with the complicated part. But as long as you just follow these directions exactly, you will soon have a pretty little button ready for swapping. 

Don't get freaked out by the code. It is really not as bad as it looks. Here is the code:

<img src=“http://www.YourButtonImageURL” alt=”YourSiteTitle ” /><div style=”width: 125px; height: 125px; overflow: auto; border: 1px solid #666666;” >&lt;a href=&#34;http://www.YourSiteURL.com&#34; target=&#34;_self&#34;&gt;&lt;img src=&#34;http://www.YourButtonImageURL&#34; alt=&#34;YourSiteTitle&#34; width=&#34;125&#34; height=&#34;125&#34; /&gt;&lt;/a&gt;</div>

Now all you have to do is copy this code and place into a text document on your computer. Not a word document. A text document. Trust me, I tried it in word first and it went all kinds of crazy. So copy and paste into your text document. Replace all of the blue with your information. 

Here is what mine looked like after I plugged in my information:

<img src="https://lh4.googleusercontent.com/-ruYIuuo2LS0/UsYAKxTy_iI/AAAAAAAACQc/jbQfz2n0cGw/s512/IMG_4215.jpg"alt="My Jolly Little Life" /><div style="width: 125px; height: 125px; overflow: auto; border: 1px solid #666666;">&lt;a href=&#34;http://www.jollylittlelife.blogspot.com&#34; target=&#34;_self&#34;&gt;&lt;img src=&#34; https://lh4.googleusercontent.com/-ruYIuuo2LS0/UsYAKxTy_iI/AAAAAAAACQc/jbQfz2n0cGw/s512/IMG_4215.jpg alt= &#34;My Jolly Little Life&#34;&#34; width=&#34;125&#34; height=&#34;125&#34; /&gt;&lt;/a&gt;</div>


Okay.... one more thing before you are finished with the code. You have your code pasted in your text document, now go through the whole thing and make sure all of the quotation marks are straight not curved. In a word document it will automatically curve them. In the text document, all you have to do is erase them and then put new ones right back where they were. The text document will straighten them right out. There should be six quotation marks. Go over every one. Here is what it will look like in the text document:

how to make a blog button, blogging tips, how to create a blog button, blog button, help with blog button, easy blog button tutorial,

Now your completed code is two part. It will have your button on top, and underneath will be the grab box with the code for your button. You want to put the whole thing on your side bar for others to grab. If ever you want just your button, copy the code out of the grab box.

how to make a blog button, blogging tips, how to create a blog button, blog button, help with blog button, easy blog button tutorial,

This is very important. Make sure you save this whole completed code somewhere that you will be able to get it again. Lord knows you do not want to got through this whole, possibly painful, process again.

Also, on a side note, once you are familiar with this code, you will be able to change the size of your button without redoing the whole thing. If you look at the code you will see where it says 250x250. All you have to do is change that to your desired size.


  Step 4: Installing your button

Hooray, this is the final and easiest step. You made this beautiful new button, now you want to place it on your blog. In blogger (which, I am sorry, is the only platform I am familiar with), go to layout and press "add a gadget". A window will pop up, scroll down until you see the option for "HTML or java script."


Paste your code into that box, save, and voila, your blog button should be on your sidebar.
Related Posts Plugin for WordPress, Blogger...