
When I first started blogging, every other blog was talking about
“grabbing buttons” and “swapping buttons.” I was like, “what the heck is this
button thing?” Now I am by no means remarkably techy, so it took me a long
time. But I did finally figure it out.
And so, in case anyone else is fairly new to blogging and feels a little
daunted by the vast array of beautiful blog buttons and the importance that is
placed on them in the blogosphere, I am going to write a brief “how to.”

It may seem like I am not the best one to be explaining this because it
is not my forte. But maybe I am perhaps the best one because it is not
my forte. I will write it in such a way that anyone will be able follow the directions (with illustrations!). It will be kind of like “idiots guide to creating a blog button.”
Very simple and easy to follow (especially cause I may need to reference it in
a few weeks just in case I forget how to do it... he he).
Step one: Create your design
I did this in Picmonkey because it is free and super easy. Press edit.
And open the photo that you want to use for your button (from your computer, web, or wherever the picture is located).

First thing you want to do is crop your photo. It is most common for
blog buttons to be square, so I would start with that. Press crop on the left
and select square from the drop down menu. But don’t apply the crop just yet.
Now is when you want to chose the size of your button. Depending upon
the width of your sidebar, you will choose the size. I personally think it is a
good idea to make several sizes so that you have the option ready to go if
people want to swap. Today we will make a fairly standard size of 250x250. Mark
the “scale photo” box and then put in the dimensions you want in the “actual
size” option. 250x250 here. After you choose the part of the image you want to
used, hit the green “apply”. Make sure you are happy with your crop and the way your button looks.

After you crop your image, you can play around with the effects, overlays, and frames to make your button exactly how you want.

Now you want to add your blog’s name (or whatever you want to say) onto your button. Press the “T” symbol on the side to open the text tool then click "add text". I text box should pop up over your picture. Play around with the fonts, colors, and size you want until you find something you like. Place the text on your button.
Now you want to add your blog’s name (or whatever you want to say) onto your button. Press the “T” symbol on the side to open the text tool then click "add text". I text box should pop up over your picture. Play around with the fonts, colors, and size you want until you find something you like. Place the text on your button.

If you like the way your button looks, then you are finished with the
designing portion! Click on save. Make sure you save it somewhere on your computer where you will know right where to find it later.
 So you have your pretty button complete. If only that was it…. But now you have to code
the button so that whenever anyone presses it, they are taken to your blog.
So you have your pretty button complete. If only that was it…. But now you have to code
the button so that whenever anyone presses it, they are taken to your blog.
Step 2: Upload your button
This is where it gets a little complicated. But don't worry. If I can do it, you can too!Step 2: Upload your button
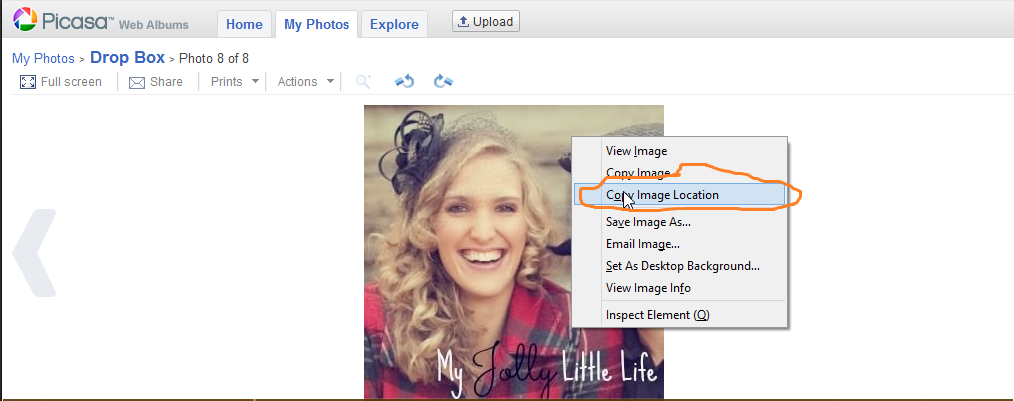
Upload your picture to Picasa web albums (I have done photobucket too, but I just found picasa to be easier). Either way, you will need to upload your image to a web hosting site.
After you upload your image to Picasa, right click and press "copy image location".
Paste the image location into a word document that you can easily find. Don't be freaked out when it looks like this:
https://blogger.googleusercontent.com/img/b/R29vZ2xl/AVvXsEi86zRSP3NEZk8qQRqkBetGGSql67EoGVWpZ_k2PJtlP2TYqEbpghoiosqQ2ifosGMLMxUVA72pagUKj4HMmaB0zlRDC47oU40c9sJKKT7tclssYpXd3OT7BYQkAz90KccXDL7dxt4uONFu/s128/250x250.jpg
That is normal.
Step 3: Create the code for your button with a grab box.
Okay... here we go with the complicated part. But as long as you just follow these directions exactly, you will soon have a pretty little button ready for swapping.
Don't get freaked out by the code. It is really not as bad as it looks. Here is the code:
<img src=“http://www.YourButtonImageURL” alt=”YourSiteTitle ”
/><div style=”width: 125px; height: 125px; overflow: auto; border: 1px
solid #666666;” ><a href="http://www.YourSiteURL.com"
target="_self"><img src="http://www.YourButtonImageURL"
alt="YourSiteTitle"
width="125" height="125"
/></a></div>
Now all you have to do is copy this code and place into a text document on your computer. Not a word document. A text document. Trust me, I tried it in word first and it went all kinds of crazy. So copy and paste into your text document. Replace all of the blue with your information.
Here is what mine looked like after I plugged in my information:
<img src="https://lh4.googleusercontent.com/-ruYIuuo2LS0/UsYAKxTy_iI/AAAAAAAACQc/jbQfz2n0cGw/s512/IMG_4215.jpg"alt="My Jolly Little Life" /><div
style="width: 125px; height: 125px; overflow: auto; border: 1px solid
#666666;"><a href="http://www.jollylittlelife.blogspot.com"
target="_self"><img src=" https://lh4.googleusercontent.com/-ruYIuuo2LS0/UsYAKxTy_iI/AAAAAAAACQc/jbQfz2n0cGw/s512/IMG_4215.jpg alt=
"My Jolly Little Life""
width="125" height="125"
/></a></div>
Okay.... one more thing before you are finished with the code. You have your code pasted in your text document, now go through the whole thing and make sure all of the quotation marks are straight not curved. In a word document it will automatically curve them. In the text document, all you have to do is erase them and then put new ones right back where they were. The text document will straighten them right out. There should be six quotation marks. Go over every one. Here is what it will look like in the text document:

Now your completed code is two part. It will have your button on top, and underneath will be the grab box with the code for your button. You want to put the whole thing on your side bar for others to grab. If ever you want just your button, copy the code out of the grab box.

This is very important. Make sure you save this whole completed code somewhere that you will be able to get it again. Lord knows you do not want to got through this whole, possibly painful, process again.
Also, on a side note, once you are familiar with this code, you will be able to change the size of your button without redoing the whole thing. If you look at the code you will see where it says 250x250. All you have to do is change that to your desired size.
Step 4: Installing your button
Hooray, this is the final and easiest step. You made this beautiful new button, now you want to place it on your blog. In blogger (which, I am sorry, is the only platform I am familiar with), go to layout and press "add a gadget". A window will pop up, scroll down until you see the option for "HTML or java script."

Paste your code into that box, save, and voila, your blog button should be on your sidebar.
Paste your code into that box, save, and voila, your blog button should be on your sidebar.
Hello from the Faith and Fellowship blog hop. Thanks for providing this tutorial. I've messed around with pictures and buttons before, but hadn't figured out the web hosting part.
ReplyDeleteThanks for stopping by, Davy! I am glad the tutorial was helpful for you :)
DeleteThis post is awesome, I've been trying to figure this out so thank you!!!
ReplyDelete